Friday, October 24, 2014
How to vent your dryer inside for heat and humidity
Yikes, it has been a while since I posted! I've done quite a few things to the house since my last post. Maybe I'll get caught up with a few blogs. This blog is a about how to vent your dryer into the home to add heat and humidity and save some money or, more accurately, not throw away some money.
When I first looked on the net for ideas on how to set up an internal dryer vent, I found a lot of hysterics. People claimed that if you vent your dryer inside the home you will get mold, you will get lint, the sky will fall, and the terrorists will win. I'll start out by saying that you will need to use common sense. If you don't have any, please don't continue reading. You'll just get all upset.
There are quite a few things to keep in mind when deciding whether this will work for you. You will need to know how often you use your dryer. Industry average is 283 loads per year. That's at least three times as many as we do, so I am below average (despite what my mother told me). But if you are living with eight people in your house, it might be possible to dry that many loads. If the house is small, if two kids are in diapers (that are being laundered), if you take in laundry as a side business, etc., you have to take those things into consideration. You get the idea on figuring out how much you actually use your dryer.
You will need to have some idea of your normal ambient humidity during the year. It's usually lower in winter, which is when some people need more heat and want more humidity in their homes. Our house is generally 40 to 45% humidity at normal room temperatures. It can drop a little below that in the winter. That is kind of low, but then we heat some with wood during the winter and that tends to dry the air. Also, our house has lots of concrete and plaster, both of which can absorb water vapor and deal with spikes in humidity. Finally, with ICCF construction, there is no air space inside of the exterior walls, the most common place for humidity to condense and create mold. So too dry in the winter is our usual concern despite being in a temperate rain forest.
The next thing to think about is how much moisture is going to go into the house or, more accurately, how much is venting the dryer into the home going to increase your ambient humidity. This is based on several factors that are rarely discussed in the articles that I found on the web. It can actually all be calculated with a fair amount of certainty if a person is willing to think about what the dryer is doing. (Thinking seems to be left out of most of the comments that I found).
Exactly how much water is the dryer going to put into the air? That depends on the efficiency of your washing machine. That's right. An old tub-type washing machine not only uses a lot of water while washing, it also leaves a lot of water in the clothing after the spin cycle. You then put the soggy clothes in the dryer and it takes a long time and a lot of heat to remove all that water. Yeah, but how do I know how much water I am really evaporating? Easy. Just remember the old saying "A pint's a pound the world around." A pint of water weighs a pound. Simply take your wet clothes out of the dryer, put them in a basket, and hold them while you stand on your bathroom scale. Dry the clothes and then weigh you, the basket, and the dry clothing again. If your clothes weigh 4 lbs less, then you have removed 4 pints = 2 quarts = 1/2 gallon of water from them by using the dryer.
I'm going to spare you all of the math, but it's readily available on the internet. For our purposes, a room 25' x 20' x 8' (4,000 cubic feet) at 68 degrees F contains approximately 1 gallon of water when it is at 100% humidity. But remember, we are starting out with our room at 40% humidity, so we only get to put a little more than 1/2 a gallon into the room before we will reach 100% humidity. And at 100% humidity, if a surface is colder than 68 degrees (like on an exterior window or inside an exterior wall), we will get condensation. We want to avoid that. We need to stay well away from 100% humidity.
But let's back up a minute. First, our washer is a high speed front loader. With a full load of towels, it spins the clothes so dry that only 2 lbs (2 pints) of water remains in a big load of towels. That load is our maximum amount of water that our dryer leaves in a load of clothes. If the load is sheets and a synthetic shower curtain, the amount can be well below 1 pint. Not every load will put 2 pints of water into the house.
Second, in our house I can have the dryer vent into an interior room that has no exterior windows, so there are no exaggerated condensation problems from cold surfaces. Third, I have an ERV whole house ventilation system that distributes air around the house (and actually exchanges humid air, but we will ignore that aspect of the ERV).
The volume of my house is approximately 13,800 cubic feet. Doing the calculation, if I dry a load of towels, I should be able to raise the humidity in the house from 40% to almost 60% relative humidity with a single load in the dryer. 80% with two loads and the dreaded 100% by drying three loads of towels.
Actually, I can't, for several reasons. There are other things in the house that also tend to absorb water vapor. Drapes, furniture, bedding, even the dry clothes on the closet (and that's not figuring in the ability of plaster and concrete to absorb moisture). Turns out that I can only get the humidity a little above 60% in the utility room where I vent the dryer into the home, but with the door to the utility room open, that high humidity quickly dissipates into the rest of the house. Two loads will change the humidity in the other rooms maybe 10% in an hour. Three loads should raise it more, but we don't usually do three loads at a time (and don't even own three loads of towels). And how would I accumulate three loads of wet clothes all at once? Save them in the sink so that I can run three wet loads in quick succession? In theory, drying four loads of towels in quick succession might cause a problem, but in reality it doesn't ever happen.
Okay, let's move along. The other "problem" that people related was the issue of lint. Your dryer has a lint filter, but it's only intended to keep the dryer vent pipe from filling up with fuzzies. It is not intended to make the air clean enough to vent into the home . (Of course, we are talking about electric dryers, as gas dryers have the combustion exhaust fumes in the vent system).
I bought a commercial "dryer diverter," the interior dryer vent pictured below. By moving a little trap door when this is installed in your dryer vent pipe, you can send the dryer exhaust into the home instead of outside.

Oops. I left my new vent in the trunk on the way home. My junky worthless interior dryer vent broke into individual junky worthless parts. Not to fear, as it was junky and worthless. One of the most worthless aspects of it was the screen "filter," which is now it's own junky little part. The filter is actually mosquito netting that isn't nearly fine enough to filter the dryer exhaust so that you would want to breathe it. It would also cause a layer of dust to accumulate all over the house. Inexpensive, yes. Convenient, yes. Worthless, yes. I didn't even use the zip ties that came with it.
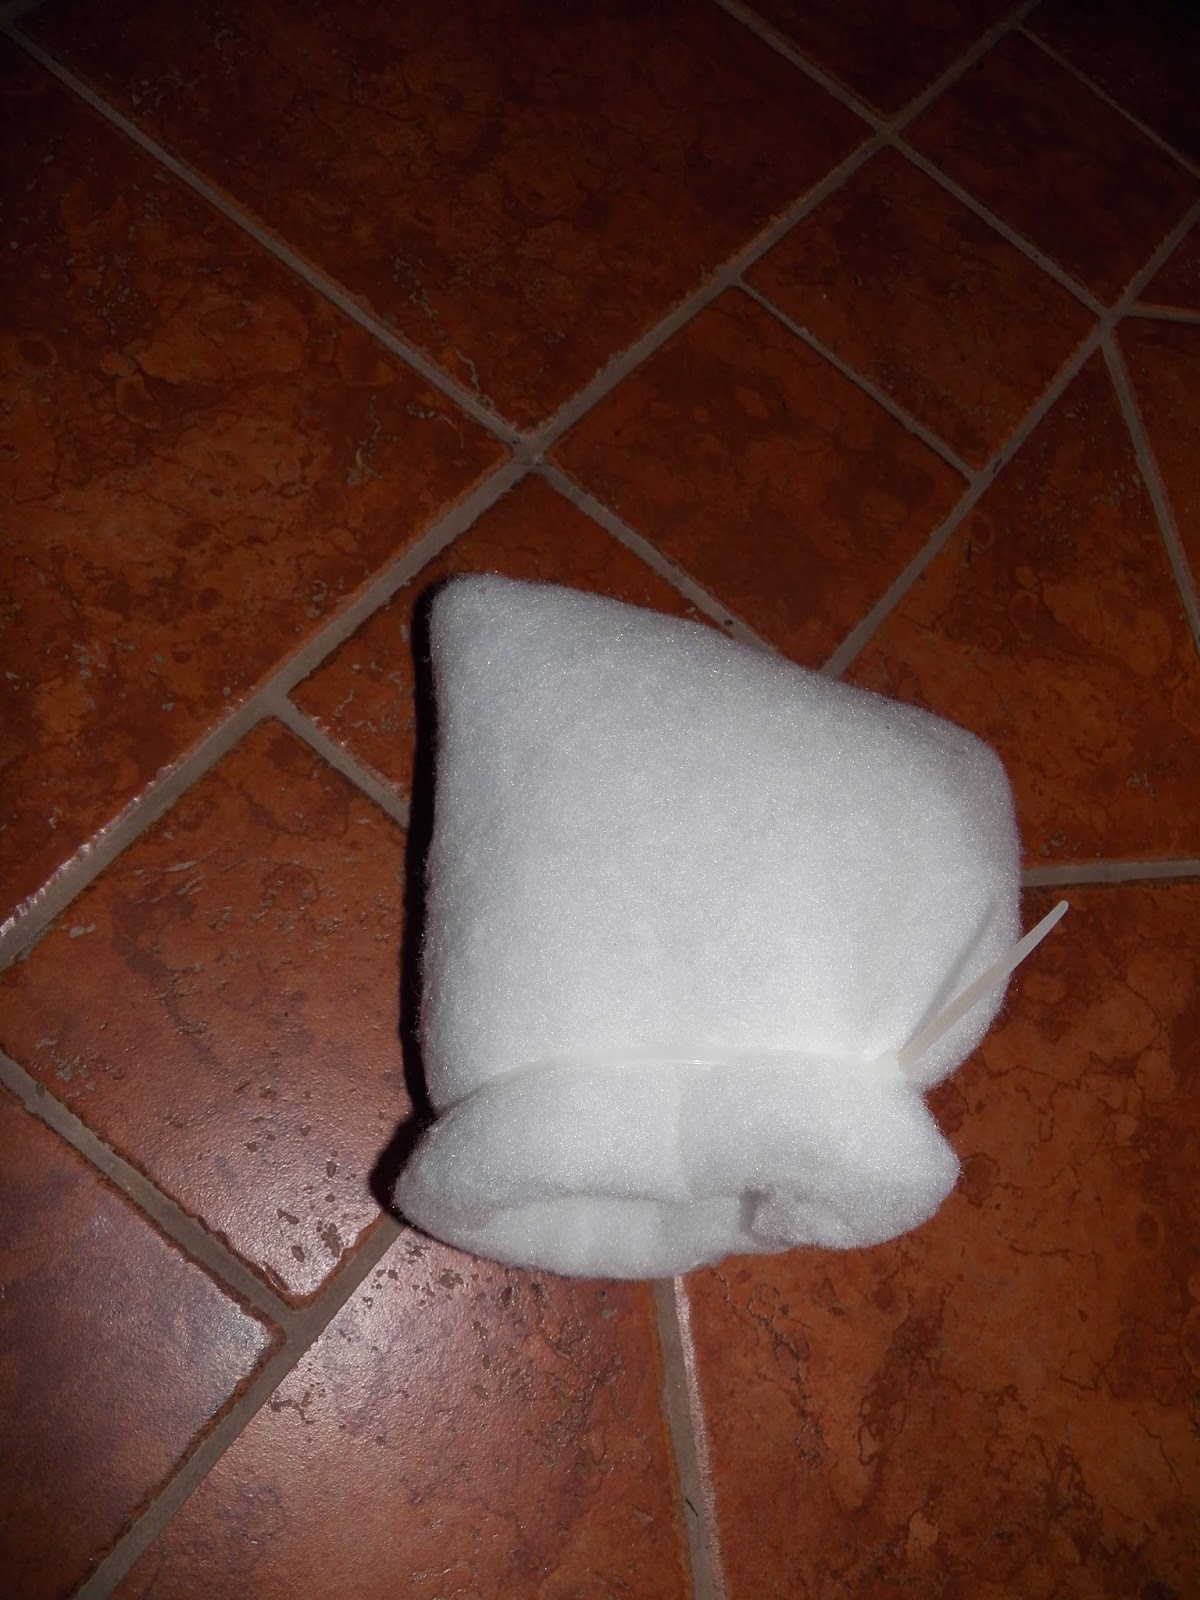
Several different types of dryer diverters are available ranging from $8 to $80. None of them work as well as a simple cheap diverter/filter that you can make yourself. You can make one from readily available high-tech "filter fabric." Go to your local fabric store and buy a dollar's worth (1/2 yard) of 1" thick polyester batting (the same stuff used in some furnace filters). Sew it into a "sock" that fits your 4" vent pipe (C = pi x D). I made mine extra long for more filter area and then attached it with a re-usable zip tie. No dust comes out, only warm moist air. I made the small one first, but when I saw how much lint it was trapping, I made a larger one to last a whole winter.
 Final filter.
 Test filter.
Now that we have addressed the humidity and dust issues, what are we really going to gain in heat? That is not easy to calculate with accuracy. First, different dryer settings have different temperatures. Second, drying times vary either automatically (with a newer dryer) or based on the amount of time you set the dryer to run.
Finally, and this is the one nobody ever thinks about, it depends in part on your exterior temperature. That's right. All of the air that you are pumping outside through a dryer vent is made up somehow by air leaking back into the home. If your home is really tight, like ours is, opening a window in the laundry room actually shortens the drying time because makeup air is more readily available. That makes it obvious that we are bringing in cold outside air when we run the dryer. If that didn't happen, your dryer would create a vacuum in the home until the walls imploded. Just kidding. Actually, the dryer blower would become ineffective and the dryer would just stop drying (or maybe catch on fire). But it points out one of the additional savings to venting inside; your dryer won't be pulling cold air into your home.
Another thing to consider is that a dryer works best with "dry" air. If you vent your dryer right into the room with your dryer, you will greatly increase the humidity of the air you are using in your dryer! As the air in the laundry room approaches 100% humidity, it can't do as much when you recirculate it back to your dryer. Again, the dryer would become less and less effective. You want low humidity air in your laundry room by the dryer intake and send the moist air off somewhere else in the house.
Our vent goes through the laundry room wall into an adjacent utility room. Although the rooms are separated by only a wall, to get from the laundry room to the utility room, you walk through the kitchen and living room, so the humidity is actually released in an area that is effectively remote from the laundry room and more closely connected to the upstairs rooms. By the time our dryer is done, the humidity in the laundry room hasn't yet risen.
But back to how much heat benefit we are getting. Modern electric clothes dryers are on 30 amp double pole breakers. It doesn't actually use all of that amperage, but standard heating elements for dryers are 5,600 watts (about 18,500 BTU per hour). How much heat is that? Most people are familiar with the little oil-filled radiator heaters that plug into the wall. Those are 1,500 watts when set to their maximum heating capacity. So an electric dryer venting into your house is basically putting out the same heat as four space heaters. And it's free. And the internal vent means that we aren't drawing in cold outside air (that would then have to be heated by a fifth space heater.) That's a generous amount of heat.
Electricity is cheaper in the Pacific Northwest where we live compared to other parts of the U.S. Drying a load of clothes has an electrical cost between 28 to 50 cents, depending on how long the dryer needs to run. That's just the amount the dryer uses without figuring in how much it costs to heat the cold makeup air that it has drawn into the home. To get the full picture, we need to heat up the makeup air to dryer temperatures. Let's say that our dryer heats up our 70F degree inside-the-house air to 170F for a "delta T" of 100 degrees and that costs us 50 cents. If our outside makeup air is 30F and we heat to 70F, we have to pay for that delta T of 40. That works out to adding approximately 40% to the dryer's electrical use cost to determine the "full amount" of electricity that the dryer is "causing" us to use when the outside temp is 30F. (Nobody really thinks about the fact that drying clothes in the winter actually costs more). All totaled, drying a load of clothes in the winter with an internal vent system saves us more than 65 cents per load in heating costs. Woohoo, we're rich! And with the additional moisture in the air, we'll also save on ChapStick!!!
If a BTU thermal analysis, calculating wattage per hour, average ambient humidity, etc., seem too complicated, here is the simple method. Below is a thermometer/hygrometer that costs about $5 at the hardware store. Place it in the room that you are venting into and see what the heat and humidity does when the dryer is running. Take it to other places in the home and, if you gently wave it around, it will give you a fairly accurate reading in a minute or two. If you are getting readings that are too high, reconnect your outside vent. Simple.

When I first looked on the net for ideas on how to set up an internal dryer vent, I found a lot of hysterics. People claimed that if you vent your dryer inside the home you will get mold, you will get lint, the sky will fall, and the terrorists will win. I'll start out by saying that you will need to use common sense. If you don't have any, please don't continue reading. You'll just get all upset.
There are quite a few things to keep in mind when deciding whether this will work for you. You will need to know how often you use your dryer. Industry average is 283 loads per year. That's at least three times as many as we do, so I am below average (despite what my mother told me). But if you are living with eight people in your house, it might be possible to dry that many loads. If the house is small, if two kids are in diapers (that are being laundered), if you take in laundry as a side business, etc., you have to take those things into consideration. You get the idea on figuring out how much you actually use your dryer.
You will need to have some idea of your normal ambient humidity during the year. It's usually lower in winter, which is when some people need more heat and want more humidity in their homes. Our house is generally 40 to 45% humidity at normal room temperatures. It can drop a little below that in the winter. That is kind of low, but then we heat some with wood during the winter and that tends to dry the air. Also, our house has lots of concrete and plaster, both of which can absorb water vapor and deal with spikes in humidity. Finally, with ICCF construction, there is no air space inside of the exterior walls, the most common place for humidity to condense and create mold. So too dry in the winter is our usual concern despite being in a temperate rain forest.
The next thing to think about is how much moisture is going to go into the house or, more accurately, how much is venting the dryer into the home going to increase your ambient humidity. This is based on several factors that are rarely discussed in the articles that I found on the web. It can actually all be calculated with a fair amount of certainty if a person is willing to think about what the dryer is doing. (Thinking seems to be left out of most of the comments that I found).
Exactly how much water is the dryer going to put into the air? That depends on the efficiency of your washing machine. That's right. An old tub-type washing machine not only uses a lot of water while washing, it also leaves a lot of water in the clothing after the spin cycle. You then put the soggy clothes in the dryer and it takes a long time and a lot of heat to remove all that water. Yeah, but how do I know how much water I am really evaporating? Easy. Just remember the old saying "A pint's a pound the world around." A pint of water weighs a pound. Simply take your wet clothes out of the dryer, put them in a basket, and hold them while you stand on your bathroom scale. Dry the clothes and then weigh you, the basket, and the dry clothing again. If your clothes weigh 4 lbs less, then you have removed 4 pints = 2 quarts = 1/2 gallon of water from them by using the dryer.
I'm going to spare you all of the math, but it's readily available on the internet. For our purposes, a room 25' x 20' x 8' (4,000 cubic feet) at 68 degrees F contains approximately 1 gallon of water when it is at 100% humidity. But remember, we are starting out with our room at 40% humidity, so we only get to put a little more than 1/2 a gallon into the room before we will reach 100% humidity. And at 100% humidity, if a surface is colder than 68 degrees (like on an exterior window or inside an exterior wall), we will get condensation. We want to avoid that. We need to stay well away from 100% humidity.
But let's back up a minute. First, our washer is a high speed front loader. With a full load of towels, it spins the clothes so dry that only 2 lbs (2 pints) of water remains in a big load of towels. That load is our maximum amount of water that our dryer leaves in a load of clothes. If the load is sheets and a synthetic shower curtain, the amount can be well below 1 pint. Not every load will put 2 pints of water into the house.
Second, in our house I can have the dryer vent into an interior room that has no exterior windows, so there are no exaggerated condensation problems from cold surfaces. Third, I have an ERV whole house ventilation system that distributes air around the house (and actually exchanges humid air, but we will ignore that aspect of the ERV).
The volume of my house is approximately 13,800 cubic feet. Doing the calculation, if I dry a load of towels, I should be able to raise the humidity in the house from 40% to almost 60% relative humidity with a single load in the dryer. 80% with two loads and the dreaded 100% by drying three loads of towels.
Actually, I can't, for several reasons. There are other things in the house that also tend to absorb water vapor. Drapes, furniture, bedding, even the dry clothes on the closet (and that's not figuring in the ability of plaster and concrete to absorb moisture). Turns out that I can only get the humidity a little above 60% in the utility room where I vent the dryer into the home, but with the door to the utility room open, that high humidity quickly dissipates into the rest of the house. Two loads will change the humidity in the other rooms maybe 10% in an hour. Three loads should raise it more, but we don't usually do three loads at a time (and don't even own three loads of towels). And how would I accumulate three loads of wet clothes all at once? Save them in the sink so that I can run three wet loads in quick succession? In theory, drying four loads of towels in quick succession might cause a problem, but in reality it doesn't ever happen.
Okay, let's move along. The other "problem" that people related was the issue of lint. Your dryer has a lint filter, but it's only intended to keep the dryer vent pipe from filling up with fuzzies. It is not intended to make the air clean enough to vent into the home . (Of course, we are talking about electric dryers, as gas dryers have the combustion exhaust fumes in the vent system).
I bought a commercial "dryer diverter," the interior dryer vent pictured below. By moving a little trap door when this is installed in your dryer vent pipe, you can send the dryer exhaust into the home instead of outside.
Oops. I left my new vent in the trunk on the way home. My junky worthless interior dryer vent broke into individual junky worthless parts. Not to fear, as it was junky and worthless. One of the most worthless aspects of it was the screen "filter," which is now it's own junky little part. The filter is actually mosquito netting that isn't nearly fine enough to filter the dryer exhaust so that you would want to breathe it. It would also cause a layer of dust to accumulate all over the house. Inexpensive, yes. Convenient, yes. Worthless, yes. I didn't even use the zip ties that came with it.
Several different types of dryer diverters are available ranging from $8 to $80. None of them work as well as a simple cheap diverter/filter that you can make yourself. You can make one from readily available high-tech "filter fabric." Go to your local fabric store and buy a dollar's worth (1/2 yard) of 1" thick polyester batting (the same stuff used in some furnace filters). Sew it into a "sock" that fits your 4" vent pipe (C = pi x D). I made mine extra long for more filter area and then attached it with a re-usable zip tie. No dust comes out, only warm moist air. I made the small one first, but when I saw how much lint it was trapping, I made a larger one to last a whole winter.
Final filter.Test filter.
The elbow that directs the dryer exhaust outside is disconnected and the filter sock is added. The sock can be taken off and the pipe reconnected in an instant.
Now that we have addressed the humidity and dust issues, what are we really going to gain in heat? That is not easy to calculate with accuracy. First, different dryer settings have different temperatures. Second, drying times vary either automatically (with a newer dryer) or based on the amount of time you set the dryer to run.
Finally, and this is the one nobody ever thinks about, it depends in part on your exterior temperature. That's right. All of the air that you are pumping outside through a dryer vent is made up somehow by air leaking back into the home. If your home is really tight, like ours is, opening a window in the laundry room actually shortens the drying time because makeup air is more readily available. That makes it obvious that we are bringing in cold outside air when we run the dryer. If that didn't happen, your dryer would create a vacuum in the home until the walls imploded. Just kidding. Actually, the dryer blower would become ineffective and the dryer would just stop drying (or maybe catch on fire). But it points out one of the additional savings to venting inside; your dryer won't be pulling cold air into your home.
Another thing to consider is that a dryer works best with "dry" air. If you vent your dryer right into the room with your dryer, you will greatly increase the humidity of the air you are using in your dryer! As the air in the laundry room approaches 100% humidity, it can't do as much when you recirculate it back to your dryer. Again, the dryer would become less and less effective. You want low humidity air in your laundry room by the dryer intake and send the moist air off somewhere else in the house.
Our vent goes through the laundry room wall into an adjacent utility room. Although the rooms are separated by only a wall, to get from the laundry room to the utility room, you walk through the kitchen and living room, so the humidity is actually released in an area that is effectively remote from the laundry room and more closely connected to the upstairs rooms. By the time our dryer is done, the humidity in the laundry room hasn't yet risen.
But back to how much heat benefit we are getting. Modern electric clothes dryers are on 30 amp double pole breakers. It doesn't actually use all of that amperage, but standard heating elements for dryers are 5,600 watts (about 18,500 BTU per hour). How much heat is that? Most people are familiar with the little oil-filled radiator heaters that plug into the wall. Those are 1,500 watts when set to their maximum heating capacity. So an electric dryer venting into your house is basically putting out the same heat as four space heaters. And it's free. And the internal vent means that we aren't drawing in cold outside air (that would then have to be heated by a fifth space heater.) That's a generous amount of heat.
Electricity is cheaper in the Pacific Northwest where we live compared to other parts of the U.S. Drying a load of clothes has an electrical cost between 28 to 50 cents, depending on how long the dryer needs to run. That's just the amount the dryer uses without figuring in how much it costs to heat the cold makeup air that it has drawn into the home. To get the full picture, we need to heat up the makeup air to dryer temperatures. Let's say that our dryer heats up our 70F degree inside-the-house air to 170F for a "delta T" of 100 degrees and that costs us 50 cents. If our outside makeup air is 30F and we heat to 70F, we have to pay for that delta T of 40. That works out to adding approximately 40% to the dryer's electrical use cost to determine the "full amount" of electricity that the dryer is "causing" us to use when the outside temp is 30F. (Nobody really thinks about the fact that drying clothes in the winter actually costs more). All totaled, drying a load of clothes in the winter with an internal vent system saves us more than 65 cents per load in heating costs. Woohoo, we're rich! And with the additional moisture in the air, we'll also save on ChapStick!!!
If a BTU thermal analysis, calculating wattage per hour, average ambient humidity, etc., seem too complicated, here is the simple method. Below is a thermometer/hygrometer that costs about $5 at the hardware store. Place it in the room that you are venting into and see what the heat and humidity does when the dryer is running. Take it to other places in the home and, if you gently wave it around, it will give you a fairly accurate reading in a minute or two. If you are getting readings that are too high, reconnect your outside vent. Simple.
This picture shows the thermometer/hygrometer about one-half hour after our dryer has run two loads. The temperature is 70F, which has dropped about 6 degrees from when the dryer was running. The humidity is still about the same at 62%. It's hard to see in the picture, but top dead center on the hygrometer (the lower dial) is 40% relative humidity, which is stated as "Dry." "Normal" is between 55% and 75%, so venting the dryer into the room has raised the humidity to right in the middle of "normal" after running two dryer loads. On this hygrometer, "Moist" starts at 75%. Testing elsewhere in the house, the humidity has risen to 52% and the temperature a couple of degrees over an hour and a half (with no other heat on in the house). Just what I wanted.
Using a "dew point table," we know that, at 62% humidity and 70F temperature, condensation would only begin on a surface that is about 55F degrees or below. That means that if we had single pane windows with no air movement, or poorly insulated walls with no vapor barrier, it would be possible to get some condensation if the outside temperature is really, really cold. So another "kitchen table" indicator for those who don't want to do the math or buy a cheapo thermometer/hygrometer is that when you see condensation on a window your humidity is too high.
But I would recommend that you think about this project a little bit, do a few calculations, and get a hygrometer. I can see where this idea would would not work under some conditions. The history of simply venting a dryer into the home with no thought, no calculations, no filter, and no monitoring probably created the myth that this should never be done. Maybe it's time to explore the possibility of direct venting your dryer.
Tuesday, April 16, 2013
Not So Cold Frame
.JPG) I built a frame with treated 2x10s on the bottom and untreated 2x10s on top. Left over Rastra blocks (ICCF or Insulated Composite Concrete Forms) were then set in and covered with left over plastic from building our hydronic radiant slab. The plastic was punctured to allow standing water to pass through. The Rastra lifts the soil up and insulates the bottom.
I built a frame with treated 2x10s on the bottom and untreated 2x10s on top. Left over Rastra blocks (ICCF or Insulated Composite Concrete Forms) were then set in and covered with left over plastic from building our hydronic radiant slab. The plastic was punctured to allow standing water to pass through. The Rastra lifts the soil up and insulates the bottom..JPG) Here is the topsoil in. Laying along side is a scap of Rasta. You can see from it's thickness that my soil is about 12" deep. Should be deep enough for anything I want to grow.
Here is the topsoil in. Laying along side is a scap of Rasta. You can see from it's thickness that my soil is about 12" deep. Should be deep enough for anything I want to grow..JPG) Another picture of the topsoil and a section of extra Rastra.
Another picture of the topsoil and a section of extra Rastra..JPG) The "cold frame" was then enclosed with a double-walled insulating plastic used for green houses. The design was such that the sheets didn't have to be cut very much and there was no scrap left over from the 4 2'x8' sheets. The top is lifted by a temperature operated piston (click on the photo). It opens the top as the interior temperature reaches 70 degrees (as it has in this case). Even still, it can't blow off all of the heat and I have recorded temperatures as high as 94 inside. You can see from this picture one of my design ideas: A raised bed that's actually raised high enough so that I can garden while sitting in a chair. I forgot to add a cup holder.
The "cold frame" was then enclosed with a double-walled insulating plastic used for green houses. The design was such that the sheets didn't have to be cut very much and there was no scrap left over from the 4 2'x8' sheets. The top is lifted by a temperature operated piston (click on the photo). It opens the top as the interior temperature reaches 70 degrees (as it has in this case). Even still, it can't blow off all of the heat and I have recorded temperatures as high as 94 inside. You can see from this picture one of my design ideas: A raised bed that's actually raised high enough so that I can garden while sitting in a chair. I forgot to add a cup holder..JPG) The front just lifts open for access. I left the front open sometimes during the day as I wasn't sure that pollinators would get in through the solar lid to pollinate my cucumbers, tomatoes, etc., but it doesn't seem to be a problem and I now rarely bother.
The front just lifts open for access. I left the front open sometimes during the day as I wasn't sure that pollinators would get in through the solar lid to pollinate my cucumbers, tomatoes, etc., but it doesn't seem to be a problem and I now rarely bother..JPG) Here, the garden is starting to take off. In the back is a scrap of heavy netting that serves as a support for cucumbers, peas, etc. I even trained a tomato along the back. You can click a few times on any picture to enlarge it. You can see two pots (black and white) suspended from the netting. Those are my seed starting pots. I can plant a couple of carrot seeds and, as I harvest the carrots from the soil, replace them with starts.
Here, the garden is starting to take off. In the back is a scrap of heavy netting that serves as a support for cucumbers, peas, etc. I even trained a tomato along the back. You can click a few times on any picture to enlarge it. You can see two pots (black and white) suspended from the netting. Those are my seed starting pots. I can plant a couple of carrot seeds and, as I harvest the carrots from the soil, replace them with starts..JPG) Here it is a little later in the season. Next to the cold frame is a composter. I later moved the composter because I had lots of pill bugs. They seemed to be able to nip off the new seedlings. Slugs are easy to keep out, but the pill bugs couldn't be kept out, so the composter was moved. It has helped some. I also don't show my latest improvement. The greenhouse now has two 300 watt waterbed heaters under the soil and on top of the Rastra insulation. The thermostats are set at 70 and the soil temperature is a fairly uniform 64 degrees (in March). I usually don't reach 64 degrees until August. Looks like I now have a year 'round garden. It's also starting to look like I can easily keep the soil too warm for spinach. That's a problem that I can deal with.
Here it is a little later in the season. Next to the cold frame is a composter. I later moved the composter because I had lots of pill bugs. They seemed to be able to nip off the new seedlings. Slugs are easy to keep out, but the pill bugs couldn't be kept out, so the composter was moved. It has helped some. I also don't show my latest improvement. The greenhouse now has two 300 watt waterbed heaters under the soil and on top of the Rastra insulation. The thermostats are set at 70 and the soil temperature is a fairly uniform 64 degrees (in March). I usually don't reach 64 degrees until August. Looks like I now have a year 'round garden. It's also starting to look like I can easily keep the soil too warm for spinach. That's a problem that I can deal with..JPG) The greenhouse keeps these guys on the hill right behind it. My tiny greenhouse also appears to be chimpmunk proof. Direct seeding outside of the greenhouse seems to attract them and they are able to dig up most seeds and sprouts.
The greenhouse keeps these guys on the hill right behind it. My tiny greenhouse also appears to be chimpmunk proof. Direct seeding outside of the greenhouse seems to attract them and they are able to dig up most seeds and sprouts.Monday, April 25, 2011
More gable and landscape work
Here's the new gable end that matches the dormer swallow-cotes. This one doesn't have bird houses in it because its purpose is to cover the peak vent. The bottom is actually louvered.

This is my bog garden "rain gutter" planter. If you click on the picture above, you can see two planters on the patio. Both sit under an area where the roof drains to the ground. The planters have an overflow (in the center back on this one) that allows the planter to fill up to the surface with water before the overflow drains into a pipe that runs under the patio. This planter has some local swamp plants, including common rush, maiden fern, etc. Some will flower and some not. No skunk cabbage.

Here's the other planter. Cattail, white water-buttercup and some stuff that will have to flower before I'll be able to tell what it is. There was a little frog in the planter, but I didn't think it would get enough to eat. Hope the raccoons stay out of this.

This is how the system drains. 

This is beach paintbrush. It's not supposed to be north of Oregon, but I brought some up from our beach.

The brain mushrooms are up. They are similar to a false morel. Usually listed as "edible with caution." Yeah, right.

Some little jelly cups.
This is Heart-leaved Twayblade. The flowers aren't in very good focus, but it's an orchid. The distinctive "tongue, lip, or beard" of the orchid is forked. It's one of the orchids that smell is intended to smell of death to attrack flies and knats. Good thing the flowers are so tiny (about the size of a sesame seed). Elves and fairies reportedly harvest twayblade because eating it gives them their incredible night vision. Too bad it's toxic to humans.


This is Heart-leaved Twayblade. The flowers aren't in very good focus, but it's an orchid. The distinctive "tongue, lip, or beard" of the orchid is forked. It's one of the orchids that smell is intended to smell of death to attrack flies and knats. Good thing the flowers are so tiny (about the size of a sesame seed). Elves and fairies reportedly harvest twayblade because eating it gives them their incredible night vision. Too bad it's toxic to humans.


Monday, April 18, 2011
Swallow houses
The swallows showed up a few weeks ago and are now looking for homes. A swallow went in one of my existing boxes, so it's time for my bird habitat project. It's a variation of a traditional dove cote ("home") placed in a gable, in this case, for the dormer gables. Originally, this type of cote would be accessed from inside the home or the the attic and the eggs taken out. Like quail and chickens, doves tend to keep laying and don't notice that the number of eggs doesn't increase. I'm making mine for swallows (and won't be harvesting the eggs.) On the right you can see that the innerds are divided into three compartments. On the left is the cover with the access holes for the swallows. The cover is "half timbered" and even has a green stucco finish to match the house.

The compartments are attached to the facia board in the peak of the dormer. Then the cover is attached.

Here's a close-up of the installation.

If you click on this picture a couple of times, you can zoom in. For the larger gables, one will get a larger "swallow cote" or maybe an "owl cote." The other will get a the same design, but it will be a "bat cote."
Monday, April 04, 2011
Landscaping with native plants (and stumps)
Here is my view of the water before any trees were trimmed.

Here's the start of my native landscaping. The stump was cut off and moved to location along with sword ferns, deer ferns, rattlesnake plantain, rhododendron, manzanita, dogwood, bear grass and lots of types of moss. Click on the picture a few times for more detail.

Here's my new view. The tree in the forground (with a kink in it and a tree swallow box just above the kink) will be removed an used as this winter's fire wood. I just haven't had a chance to cut it down.

Now I can actually see my beach.

Click on this picture a few times to see me cutting off the top of this hemlock. A couple of trees were taken down completely. This hemlock had madronas on both sides, so it could not just be felled as there wasn't a place to drop it without it hanging up in the madronas. It had to come down in pieces after all the branches were removed.


Monday, January 17, 2011
Here's the before picture of the patio area. Next to the bucket is a drainpipe that will be connected to a planter that catches the roof runoff at that point. The copper downspout in the corner will get a similar treatment using either a planter or a birdbath. The house does not have any traditional gutters to clean out.

This is the "before" picture taken from the parking area. You can see that the footing of the house is exposed.

The "after" picture shows the area surrounding the house having been filled in behind a small retaining wall.

A little more fill was needed in some areas behind the patio retaining wall. To the left is my road down to the beach.

Here's the start of the path to the studio. It's still kind of steep, but it closes off the road and looks a lot better.


There are only three small areas where the roof drainage drops on to the patio. For the center one, I put up a copper leader box and a 3" copper downspout. It drops into a birdbath that I have modified so that any overflow goes into a footing drain under the patio. During our heavy December winds and rains (6" one day), it worked perfectly. The leaves and needles end up in the bird bath, where I can just grab a couple of handfulls and toss them over the front of the patio. 
This is one of the planters that sits under the drip line on the corners of the patio area. A pipe runs out of the planters and in to a drain pipe. I'm thinking of planting it with pond plants and having it almost full of water.

We will have to spend several weekends moving ferns, salal, oregon grape, nootka rose, etc. for the landscaping. This picture shows that the pea gravel from the patio edging continues around the rest of the house. I might give me a little vegetation-fee area. We shall see.

If you click on the picture, you can see the path to the studio in the background. It now has a layer of crushed gravel on the path. This also is a good shot of the entire patio/yard area having been brought up about 18 inches with the hardscape.

Monday, December 27, 2010
The landscaping begins
Here's a few "before" pictures. The footing was built on grade and has to be backfilled to make it disappear.

This is going to be a patio area. You can see my new copper downspout in the corner. I'll have to post pictures of that in the "after" section. The step from the french door is hanging 10 inches above grade, but that will change.

This is just the lip of the drop-off down to the water. At the left is some of the drain piping that will be installed under the patio and across the face of a little wall that will be built by Randle's Landscaping.

This is the view out of the french door towards the water.

This is after the little wall was built along the lip of the drop-off. You can see that it rained A LOT during the process. Gravel was spread out for setting the paver stones after drain gravel, filter fabric, and a perforated pipe was placed behind the wall. The wall is only two blocks high (12 inches), but plenty of drainage was provided.

Now the pavers are being set (and the sun came out). This shows the southern exposure and the reflection on the water. 

More pictures next week when it's finished.

![]()